

 Публикации
Один из самых трудоемких проектов, что когда либо выкладывалось на VideoHive. Этот универсальный проект можно полностью анимировать на свой вкус. Можно создавать своих персонажей: мужчин, женщин, детей, собак. Менять их одежду, прическу, настроение, делать так, чтобы они ходили, стояли, сидели, звонили, работали в офисе и т.д. Есть стулья, сумки, компьютеры, шкаф, диван, сейф, деньги, жилой дом, подарок, медаль, телефон, фотоаппарат, планшет, принтер, магазины, самолет, воздушный шар, велосипед, различные предметы быта и еще много чего. Вы можете создать строгого начальника, офисного работника, школьника(цу), рыцаря, мачо, футболиста, космонавта, пирата, тренера, ковбоя, повара, милиционера, ниндзя, туриста, индейца, профессора, врача, зомби ну и конечно же обычных простых граждан. Помимо всего этого есть масса типографических титров.
Настоятельно рекомендуется посмотреть демо-ролик!
Deon
Регистрация: 03 авг 2014Off Активность: июн 01 2024 23:55
#29617 Супер анимация видеоинфографика - своя история на After Effects project
 Написано
на 30 Июнь 2014 - 11:25
Написано
на 30 Июнь 2014 - 11:25
#164367 Отличные скрипты для Adobe Illustrator.
 Написано
на 18 Сентябрь 2015 - 18:59
Написано
на 18 Сентябрь 2015 - 18:59
Ссылка на продажник:
Описание курса:
Подборка отличных платных скриптов для иллюстраторов.
1. Magic Eraser Illustrator Script (обрезает все объекты за артбордом)
2. Magic Pattern Light Illustrator script (создает бесшовные паттерны)
3. Make Me Pattern Action Set for Illustrator (Экшены для создания повторяющихся паттернов)
4. Sketch Your Logo
Запускаешь экшен получаешь карандашный эскиз (скэтч ©от художников)
5. 2D Trash Stamper - Vector Actions Pack
Эти действия делают штампы
6. Typograph! Рисование глифами шрифта: открой фотографию, запусти скрипт,выбери любой шрифт (слова или отдельными символами)
7. Vector Detonator - Illustrator Actions Pack
8. Seamless Pattern Creator -Illustrator Action Set
Патерн креатор из одного вектора — много маленьких объектиков.
Скачать:
#37130 3800 иконок! [Flat, Line (iOs), Scene, BoldLine]
 Написано
на 28 Июль 2014 - 00:12
Написано
на 28 Июль 2014 - 00:12
#51334 4-x недельный тренинг по профессиональной обработке фотографий 2.0
 Написано
на 13 Сентябрь 2014 - 16:26
Написано
на 13 Сентябрь 2014 - 16:26
4-x недельный тренинг по профессиональной обработке фотографий 2.0
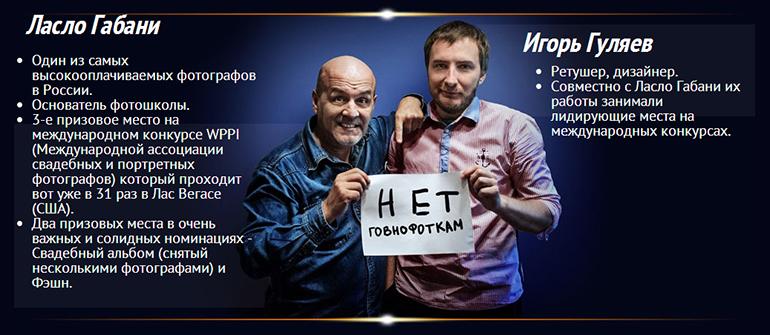
Ведущие: Ласло Габани и Игорь Гуляев.
С 3 по 28 февраля Ласло Габани и личный ретушер - Игорь Гуляев поделятся секретами в области обработки, которыми пользуются на протяжении вот уже 8 лет совместной работы! Секретами, которые позволили из года в год (а именно в 2010 и 2011) занимать призовые места в престижнейших международных конкурсах WPPI в Лас-Вегасе (США) и при этом - сразу в нескольких номинациях (от Fashion до Свадебных альбомов)!
Программа тренинга:
3 ФЕВРАЛЯ.
Тема: Как обработать фотографии для обложек журнала.
1. Узнаете об особенностях обработки обложек разных журналов.
2. Узнаете, чем отличается обычная ретушь от ретуши для обложку.
3. Научитесь видеть и убирать недостатки на фото.
4. Узнаете о правилах съёмки обложек разных журналов.
5. Научитесь делать правильную Hi-End ретушь.
6 ФЕВРАЛЯ.
Обратная связь: Как обработать фотографии для обложек журнала.
10 ФЕВРАЛЯ.
Тема: Коллажирование.
1. Научитесь составлять сложные коллажи.
2. Научитесь работе со сложными масками.
3. Узнаете, что нужно сделать, чтобы все элементы коллажа смотрелись целостно.
4. Возможность увидеть своими глазами съемку «под коллаж».
5. Узнаете основные ошибки коллажа.
6. Взаимодействие элементов коллажа с источниками света.
7. Отражения и блики как важные элементы коллажа.
8. Научитесь делать крутую аватарку для себя и своих друзей!
13 ФЕВРАЛЯ.
Обратная связь: Коллажирование.
17 ФЕВРАЛЯ.
Тема: Pin-Up
1. Научитесь делать фото в стиле Pin-up.
2. Освоите новые техники.
20 ФЕВРАЛЯ.
Обратная связь: Pin-Up.
24 ФЕВРАЛЯ.
Тема: Обработка фотографий в стиле Артуро Елена.
1. Узнаете, что нужно для того, чтобы делать снимки в стиле Артуро Елена.
2. Освоите основные инструменты трансформации в Photoshop.
3. Сможете виртуозно владеть фильтром Liquify.
4. Научитесь перекрашивать детали одежды и менять оттенок кожи.
5. Узнаете о пропорциях тела и возможности их трансформации.
27 ФЕВРАЛЯ.
Обратная связь: Обработка фотографий в стиле Артуро Елена.
[/spoiler]
Продажник:
Скачать:
Понравился материал? Жми стрелочку зеленую 
#63677 26 профессиональных уроков от LearnPhotoEditing
 Написано
на 22 Октябрь 2014 - 17:40
Написано
на 22 Октябрь 2014 - 17:40
HOW TO CREATE A CARTOON CHARACTER WITH PHOTOMANIPULATION & RETOUCHING 
TRANSFORMING PHOTOS OF REAL PEOPLE INTO CARICATURES
TRANSFORMING PHOTOS OF REAL PEOPLE INTO CARICATURES
Photomanipulation + Retouching + Color Grading Tutorial
We will be covering a lot of things in this massive tutorial. You will learn step by step how you can create any cartoon character you imagine using photomanipulation, retouching and color grading techniques. With only Photoshop and stock photos (or your own) you can create a unique caricature that can be a logo, a mascot for a product, a character in an ad, etc.. You can of course use the same techniques explained in this tutorial, in a more subtle way, to spice up your portraits or images.
This tutorial has a massive 89 steps detailing the entire process to achieve the image above and don't worry, all my tutorials can be done by anyone who has basic knowledge of Photoshop. Unlike other tutorials you'll sometimes see out there, you don't need to be a skilled digital painter to achieve the same results I get here - as I'm not a good digital painter myself 
Click the link below or the image for more info on this tutorial!
HOW TO MAKE YOUR PORTRAITS LOOK OUT OF THIS WORLD 

USING RETOUCHING TECHNIQUES TO CREATE FANTASY PORTRAIT
USING RETOUCHING TECHNIQUES TO CREATE FANTASY PORTRAIT
Retouching + Color Grading
In this 50 minute VIDEO tutorial, we will start with an unretouched portrait of a girl, a photo anyone can take at home with their camera and transform it into some sort of fantasy character. We will go through every step I took to get the final result, from working on the skin, color grading, lighting and finishing with the background.
With the techniques you'll master after completing this Photoshop tutorial, you will be able to create many different looks for your portraits, whether you just want a subtle enhancement or you really want to push it and transform your portrait into something that is out of this world!
HOW TO MAKE FACIAL FEATURES POP OUT WITH RETOUCHING 

USING PHOTOSHOP TOOLS TO ADD DEPTH & CHARACTER TO A FACE
USING PHOTOSHOP TOOLS TO ADD DEPTH & CHARACTER TO A FACE
Advanced Retouching Tutorial
In this 130-minute video tutorial I will show you different retouching techniques and tricks that will help you transform regular people into eye-popping characters. In this Photoshop tutorial, we will enhance the facial features of the man and the woman giving them a funny cartoonish look perfect for our artwork. We will then work on colors and add a background that will mesh well with our characters. In this case, I choose a background that would give the impression that those two were in an insane asylum!
HOW TO CREATE A SURREAL LOOKING CHARACTER WITH ADVANCED RETOUCHING TECHNIQUES
TRANSFORMING AN AVERAGE JOE INTO AN EYE POPPING CHARACTER
TRANSFORMING AN AVERAGE JOE INTO AN EYE POPPING CHARACTER
Retouching + Photomanipulation + Color Grading Tutorial
In this detailed 3-hour Video Tutorial, I will show you step by step how you can turn an average Joe into a surreal eye-popping character using advanced retouching techniques. We will also be working on adding light effects to the image, adding a rim light around our character and then color grading our scene to make it look rather creepy.
This Photoshop tutorial will benefit anyone who wants to take their game to the next level when it comes to creative portrait retouching!
Click the link below or the image for more info on this tutorial!
HOW TO GIVE YOUR PORTRAITS THE "VIDEO GAME LOOK"
TRANSFORMING A PORTRAIT INTO SOMETHING SLEEK AND ARTISTIC
TRANSFORMING A PORTRAIT INTO SOMETHING SLEEK AND ARTISTIC
Retouching Tutorial
Video games these days are more and more realistic and a lot of attention is put on the esthetics of their 3D characters. In this 2 hour+ Video Tutorial, we will transform a portrait of a regular guy into something that look straight out of the latest video game. And of course, if you want something that looks a little more realistic, we can easily tone down the effects while keeping a very original look!
In this Photoshop tutorial we will use advanced retouching techniques that you can use to create that same sleek/artistic look for any portraits.
Click the link below or the image for more info on this tutorial!
HOW TO CREATE MORE IMPACTFUL PORTRAITS
IMPROVING THE LOOK OF THE SKIN WITH STYLE
IMPROVING THE LOOK OF THE SKIN WITH STYLE
Color Grading + Retouching Tutorial
In this 105-minute video tutorial, I show you how you can improve the look and details of someone face/skin and really give your photos or the people in your photomanipulatons a very cool and impactful look! Starting with a generic picture of a business man, we will layer by layer improve the details, contrasts and colors until we get something that will really get people's attention!
Click the link below or the image for more info on this tutorial!
HOW TO ADD AN ENCHANTED ATMOSPHERE TO YOUR PHOTOS
IMPROVING THE BACKGROUND AND MAKING YOUR SUBJECT POP OUT
IMPROVING THE BACKGROUND AND MAKING YOUR SUBJECT POP OUT
Advanced Color Correcting Tutorial
In this 2 hour video tutorial we will take this photo of a little girl standing in the woods, transform it into a fairytale-like scene and make her pop out of the photo! Most of this tutorial will focus on color correction/color grading techniques that will allow you to drastically change the look of a photo!
If you are looking to make your photos 'pop' more by improving the look of the background and foreground, this tutorial is for you!
HOW TO TURN YOUR PHOTOS INTO HIGH IMPACT MAGAZINE ADS
GIVE YOUR PHOTO A "PAINTED LOOK" WITH SURREAL CONTRASTS & COLORS
GIVE YOUR PHOTO A "PAINTED LOOK" WITH SURREAL CONTRASTS & COLORS
Advanced Color Grading Tutorial
In this 55-minute video tutorial we will use advanced color grading techniques to transform a photo that desperately needs more punch into an high impact image that could be used in a magazine ad for example. By using different techniques to exaggerate to contrasts and accentuate the colors, we can give our photo a sort of "painted" look that is very popular right now with commercial photographers. If you want to take your photography to another level, this tutorial will show show step by step how to edit your photos like the pros. And if you are a graphic designer, the knowledge you will learn in this Photoshop tutorial will further help you to create eye-popping art!
ALSO, because we dramatically enhances the contrast and details of the photo, this technique becomes perfect for anyone who wants to create stunning Black & White photos. CLICK the image above or the link below to see how the B&W photo looks like!
HOW TO GIVE A PHOTO A COOL GRUNGY DESATURATED LOOK
TURNING A PHOTO INTO AN EDGY COVER ART
TURNING A PHOTO INTO AN EDGY COVER ART
Photo Editing Tutorial
In this 85-minute Video Tutorial, we will transform this photo of "rebellious" teenagers into something much edgier and grungier, something that could certainly be used as a poster or album cover for a music band. This look/effect could also be used for photos of extreme sports or even protraits!
In this tutorial, we will explore different editing techniques that will allow us to bring out the details in our image, improve contrast and adjust the colors to give us the look you see above.
Click the link below or the image for more info on this tutorial!
DIGITAL PAINTING FOR BEGINNERS: HOW TO PAINT WITH A MOUSE
NO GRAPHIC TABLET NEEDED, PAINT A GIRL FROM SCRATCH WITH YOUR MOUSE
NO GRAPHIC TABLET NEEDED, PAINT A GIRL FROM SCRATCH WITH YOUR MOUSE
Digital Painting Tutorial
In this 3-hour video tutorial I'll show you how you can take retouching to the next level by mastering digital painting. In this tutorial, we will create everything from scratch, the eyeball, the iris, the eyes, the face, the nose, the mouth, the hair and the shoulder/neck.
Digital painting can really be difficult, it usually requires a digital tablet and if you are not a great painter to begin with, you are looking at a steep learning curve. In this tutorial, I show you techniques any beginnners in digital painting can recreate and that, with his/her mouse!
Once you master those techniques, you'll be able, for example, to add digitally painted eyes, like on the 'asylum lady' image above, which will give your images a really cool and original look!
HOW TO CREATE FANTASY CHARACTERS IN PHOTOSHOP
TRANSFORMING AN OLD MAN INTO AN ALIEN WITH PHOTO MANIPULATION
TRANSFORMING AN OLD MAN INTO AN ALIEN WITH PHOTO MANIPULATION
Photomanipulation + Color Grading Tutorial
What you can do with photomanipulation is only limited by your imagination. No need for any 3D softwares to create what you have in mind, all you need is Photoshop. In this tutorial, I will show you step-by-step how I turned an old man into an alien creature. With the knowledge you'll acquire here, you'll be able to do much more than just aliens, you will be able create your own photomanipulations and transform any image you want that you can use for any purpose you want. Aside from being a fun thing to do, photo manipulations are especially usefull for creating ads or high impact images for your blog. Click the link below to learn more.
HOW TO CREATE BREATHTAKING IMAGES
USING ADVANCED COLOR GRADING AND SOME PHOTOMANIPULATION TO MAKE YOUR PHOTOS LOOK SPECTACULAR
USING ADVANCED COLOR GRADING AND SOME PHOTOMANIPULATION TO MAKE YOUR PHOTOS LOOK SPECTACULAR
Color Grading + Photomanipulation Tutorial
Getting guest teachers to create premium Photoshop tutorials for this site is something you will see more and more and for this one, it's an exceptional artist and photographer known as Ipoenk Graphic who wrote this exclusive tutorial for the members of LearnPhotoEditing.net!
Ipoenk starts off with a photo he took himself and by using advanced color grading techniques and a bit of photomanipulation, he turns a snapshot of rural life into a breathtaking award-winning image. In this tutorial, he will show you step by step how he was able to achieve such a transformation. The knowledge you'll gain after completing this tutorial will allow you to transform your own photos into magical works of art!
HOW TO CREATE A FANTASY ENVIRONMENT WITH PHOTOMANIPULATION
USING PHOTOMANIPULATION AND COLOR GRADING TO ADD CREATIVITY TO YOUR PHOTOS
USING PHOTOMANIPULATION AND COLOR GRADING TO ADD CREATIVITY TO YOUR PHOTOS
Color Grading + Photomanipulation Tutorial
If you are a professional photographer, you absolutely need to learn the art of photomanipulation as this simple skill will allow you to offer much more than simple photos to your clients, you could offer them, for example, a trip back in time! Way back!
My friend and great artist Rivo Rareano created this tutorial exclusively for the members of LearnPhotoEditing.net using a photo he took of his son to create this beautiful "Lost World" art. In a Video Tutorial that last just about 2 hours, I will recreate his fantastic image and will explain to you step by step how Rivo created it. The end result is what you see above! In this Photoshop tutorial, you will not only learn about photomanipulation but also different color grading techniques.
HOW TO CHANGE THE LOOK OF A DULL PHOTO WITH COLOR GRADING
PUSHING A RAW PHOTO TO THE MAX IN PHOTOSHOP
PUSHING A RAW PHOTO TO THE MAX IN PHOTOSHOP
Color Grading Tutorial
In this 57-Minute Video Tutorial I take a RAW photo and transform it into something much more interesting by pushing the color grading to the max. I start off in the Photoshop RAW photo editor (Camera Raw) and go through my usual workflow to prepare the photo for an extreme transformation in Photoshop. Then I show you all the steps I took and techniques I used to achieve the image you see right above!
Shooting RAW is so essential in my opinion to really get the most out of your photos, to be able to bring back the details in the shadows and highlights but also to be able to bring back colors that could have been lost if you shot JPEGs.
HOW TO DO AN EXTREME MAKEOVER DIGITALLY IN PHOTOSHOP
TRANSFORMING A MODEL INTO A SUPERMODEL
TRANSFORMING A MODEL INTO A SUPERMODEL
Advanced Retouching + Color Grading Tutorial
In this MASSIVE 2 hour VIDEO tutorial, we will digitally transform a model into a Supermodel using advanced retouching techniques. This is a tutorial I'm doing in collaboration with popular professional photographer Bishop Bautista ( www.bishopbautista.com ) who took the original photo. This tutorial was actually inspired by the way he edited and transformed that same exact photo. I tried to somewhat recreate what he did and this is my version and I'll show you exactly, step by step, how I did it!
I believe that anyone with basic skills in Photoshop can do this tutorial and once you'll master this extreme transformation technique, you'll be able to not only do wild transformations like this one but also more subtle ones that your subject will certainly appreciate and be amazed by!
HOW TO BRING OUT COLORS & DETAILS IN YOUR PHOTOS
TURN A PHOTO INTO A "REALITY SHOW" POSTER AD
TURN A PHOTO INTO A "REALITY SHOW" POSTER AD
Advanced Color Grading Tutorial
In this 52-minute video tutorial we will use advanced color grading techniques to create a tone mapping effect without the use of any plugins or 3rd party software, we'll only be using Photoshop and what comes with it. We will start out with a photo taken with the aid of an off-the-camera flash and turn it into some sort of "reality show" poster ad. Taking a photo while using an additional fill-light or reflectors helps us retain a lot of details in the shadows and highlights which make it easier in post-production to really push the color grading.
This tutorial will be really helpful to anyone who wants to give their photos a professional look with richer colors and higher contrasts. Click the link below to learn more.
HOW TO MAKE THE MOST OUT OF YOUR RAW PHOTOS
TURN A PHOTO WITH STRONG SHADOWS & HIGHLIGHTS INTO SOMETHING THAT LOOKS LIKE A HDR PHOTO
TURN A PHOTO WITH STRONG SHADOWS & HIGHLIGHTS INTO SOMETHING THAT LOOKS LIKE A HDR PHOTO
Advanced Color Grading Tutorial
In this 45-minute video tutorial I will show you how you can get the most out of a RAW photo especially when your subject or the sky couldn't be properly exposed. When you take photos in nature and you don't have with you a reflector, especially when the sun is going down and you want to capture it along with your subject, you'll run into some problems. Either the sky will be blown out or your subject will be too dark. You can however with Photoshop correct that problem, bring out hidden details in the shadows and highlights as well as colors you didn't think were there. If you want to make your photos "pop" more, this is the tutorial for you!
HOW TO CREATE A LIGHTBOX FOR POCKET CHANGE!
CREATING A SUPER CHEAP LIGHTING SETUP FOR OBJECT PHOTOGRAPHY
CREATING A SUPER CHEAP LIGHTING SETUP FOR OBJECT PHOTOGRAPHY
Lighting + Color Correcting/Grading Tutorials
This one is a huge tutorial, actually 11 wrapped up into one. 11 objects were photographed using different lighting setups and I will demonstrate in details how each were done on video. Then I go through how I color corrected/graded in Photoshop each of the 11 photos.
The entire goal of this tutorial was to build the cheapest lightbox possible that would also give you professional results for photos of products you are selling, photos of food for your blog, stock photography, photos for your design business, etc... All the lights used were bought at the dollar store and at my local hardware store for barely any money. Click the link below to learn more.
HOW TO MAKE A PORTRAIT POP OUT OF THE SCREEN
USING ADAVANCED PROCESSING + COLOR GRADING TECHNIQUES TO INCREASE THE DETAILS OF THE FACE
USING ADAVANCED PROCESSING + COLOR GRADING TECHNIQUES TO INCREASE THE DETAILS OF THE FACE
Color Greading Tutorial
Make your subjects "pop" by increasing the details and realism of your photos. This Photoshop tutorial will focus on just that where we will start with a generic photo of an old man and then using different techniques we will transform the photo into something much more eye-catching. Click the link below to learn more.
HOW TO TRANSFORM YOUR PORTRAITS WITH COLOR GRADING
PUSHING THE COLORS AND REDUCING THE SHADOWS
PUSHING THE COLORS AND REDUCING THE SHADOWS
Color Grading Tutorial
In this tutorial, we will push the limits of color grading without degrading the image. We will add colors to a very grayish, nearly black and white photo and then we will bring back the details from the shadows resulting in a drastically changed and more pleasing look. Click the link below to learn more.
HOW TO CREATE A ZOMBIE INFESTED CITY
COMBINING PHOTOMANIPULATION & COMPOSITING TO CREATE A POST-APOCALYPTIC SCENE
COMBINING PHOTOMANIPULATION & COMPOSITING TO CREATE A POST-APOCALYPTIC SCENE
Photo Manipulation + Compositing Tutorial
Compositing is a very useful procedure that consist of combining visual elements from separate sources into a single image - it is a process used for many purposes but it is especially useful for creating a fantasy background for your model/character/subject. Compositing is a tool anyone who wants to spice up their images need in their toolbox.
In this Photoshop tutorial, I used compositing to create a burning city with crumbling buildings that served as a backdrop for my post-apocalyptic scene and then I used photomanipulation to transform regular people into the flesh-eating zombies you see in the foreground! Click the link below to learn more.
HOW TO RETOUCH YOUR PORTRAITS LIKE THE PROS
GIVING YOUR SUBJECTS THE FLAWLESS LOOK THEY ALWAYS WANTED
GIVING YOUR SUBJECTS THE FLAWLESS LOOK THEY ALWAYS WANTED
Retouching Tutorial
Retouching is something photographers always end up doing when taking portraits but one particular popular look, one that we often see in magazines or ads for beauty products is the flawless "airbrushed" look. Well, there's no airbrushing going on in this Photoshop tutorial but what we will do here is take the unedited photo of a model with minimal make up and we will "glam it up", get rid of all imperfection and finally create the type of photo we can often see in beauty product ads and fashion magazines. Click the link below to learn more.
*Update* For this retouching tutorial, I am using a completely different technique than the one I used for the NEW retouching tutorial at the top of this page. Both techniques are really useful and can be used for different situations.
HOW TO IMPROVE THE LOOK OF YOUR WEDDING PHOTOS
USING COLOR CORRECTING + COLOR GRADING TO ENHANCE YOUR PHOTOS
USING COLOR CORRECTING + COLOR GRADING TO ENHANCE YOUR PHOTOS
Color Grading + Color Correcting Tutorial
This is a 25 minute long video tutorial going through the steps I take to color correct and color grade my photos. This is the perfect tutorial to learn the basics of photo editing in Photoshop and get you started. Click the link below to learn more.
AND THE LIST GOES ON BELOW: MORE TUTORIALS YOU'LL GET ACCESS TO BY BECOMING A MEMBER!
TAKE YOUR SKILLS TO THE NEXT LEVEL
Hi, my name is Patrick and I'm a professional graphic artist, photo editor, colorist (photo & video) and photographer.
My main goal with this site is to teach you how you can create better photos by spending as little money as possible and it all starts with photo editing.
No, you don't need a $3000 camera or a $1500 lens to take professional quality photos. In fact, the difference you will notice between a photo taken with an entry level DSLR camera + the kit lens and the same photo taken with the Canon 5D Mark III for example is minimal compare to the difference you'll notice between one photo expertly edited in Photoshop and the same that wasn't. If you already have Photoshop, (you can download the free trial for 30 days btw) you can improve your photos dramatically by learning how to properly color correct and color grade.
Then, you can take your photos to an whole new level if you can master the art of what we call photomanipulation, compositing and retouching. By mastering those techniques, you will be able to turn your photos into digital art!
Some sites are selling their tutorials $25+ a piece, at only $5 per tutorial, I could perhaps charge $100 for all of them, but I want to give you a MUCH better deal than that! When you join this site, you pay a one-time fee of $47 $28 (Limited Time Offer) for a Lifetime Membership which gives you access to ALL tutorials. Since I am constantly adding more tutorials, the price will go up accordingly - by securing your lifetime membership now, you will have access to all the future tutorials absolutely FREE!!
All source images for the tutorials are supplied to you so you'll be able to do exactly what I did. The tutorials were all done using Photoshop CS5 so CS5 or a newer version is recommended. You can get a lot done with CS3/CS4 also. If you want to try out a more recent version, Adobe offers a Free 30-day trial. Note that if you have Photoshop Elements, you can certainly learn a lot with my tutorials but know that most of the color grading I do is done with options not available in Elements.
If you are on this website and have read until this point, it's because you are a motivated artist that wants to improve and you realize that to fully unleash your talent, you need the technical knowledge you might be missing to fully express it.
Learning all the ways you can edit your photos and images is like someone that finally learns the proper drawing techniques. Before, the person was making interesting doodles, now he/she's creating works of art. The talent was there but it was not fully utilized. And it's the same thing with digital art and photo editing, once you learn the proper methods, you then unleash the creativity in you that couldn't fully be expressed before.
What you'll learn on this site is just the start, a glimpse of what's possible for you to achieve. By joining this site and practicing what I'll teach you, I firmly believe that you too can become a photo/image editing expert. You may doubt your potential at first but I guarantee you that after surprising yourself a few times with better than expected results, your confidence will grow and you will be believing in your true potential.
It's important to have goals and that's why you are here, if it's career goals (photography, digital artist), to paraphrase the great Jim Rohn, get the skills, take the classes, be more valuable. If it's personal goals (hobby), push yourself, get the knowledge and be what you want to be.
If for any reasons you are not completely satisfied with my training tutorials, I'm offering you a 60-day, no questions asked, money back guarantee:
If you don't think LearnPhotoEditing is worth it, simply drop me an email - and you'll get all your money back instantly.
So don't wait, get the knowledge and start creating stunning images today by becoming a member of LearnPhotoEditing.net!!
Помог? Нажми 
#131853 [Lynda.com] Bootstrap 3: Добавь интерактивности на свой сайт (Jen Kramer, 201...
 Написано
на 12 Май 2015 - 19:05
Написано
на 12 Май 2015 - 19:05
[Lynda.com] Bootstrap 3: Добавь интерактивности на свой сайт
Lynda.com на русском
Оригинальное название: Bootstrap 3: Adding Interactivity to Your Site
Автор: Jen Kramer
Продолжительность: 1ч 55м
Дата релиза: 05 июня 2014
Перевод: голос + субтитры
Bootstrap от Twitter – один из самых популярных HTML/CSS/JavaScript фреймворков, используемых для создания отзывчивых веб-сайтов. В этом курсе Джен Крамер показывает, как с помощью Bootstrap и простого текстового редактора добавлять такие интерактивные элементы, как thumbnail gallery (галерею изображений), image carousel (карусель картинок) или форму обратной связи. Кроме того, она учит стилизовать эти элементы с помощью CSS и добавлять полезные всплывающие окна на JavaScript и подсказки, которые усиливают удобство их применения.
Темы курса:
- Установка Bootstrap 3, Sublime Text 2 и jQuery
- Проектирование thumbnail gallery (галереи изображений)
- Создание модальных окон
- Создание image carousel (карусели картинок)
- Связывание изображений и добавление заголовков
- Изменение вращения карусели
- Планирование и стилизация формы обратной связи
Продажник: https://goo.gl/S808Nj
Скачать:
#42896 Дизайн для iOS от skillstore.ru (2013)
Написано
Гость
на 15 Август 2014 - 23:46
Цена: от 8900 до 15000 рублей
Продажник: http://skillstore.ru/ios/ (продажник уже 2014 года)

Дизайн приложений для iOS.
В этом курсе научат, как придумать свою идею приложения за 2 недели, написать пользовательский сценарий, как разработать навигацию, как разработать стиль и полностью нарисовать дизайн!
#138579 Создание фирменного стиля и брэндбука (2015)
Написано
на 06 Июнь 2015 - 18:55
Школа Артема Горбунова - за их курсы плюсанул бы от души..
#132061 Информационный стиль и редактура текста. Максим Ильяхов
 Написано
на 13 Май 2015 - 10:58
Написано
на 13 Май 2015 - 10:58
Цена
Оф.продажник
artgorbunov.ru/educenter/text/
Описание
Текст пишут все.
Даже если в компании нет редактора, кто-то занимается текстом: маркетолог, дизайнер, клиент, менеджер, верстальщик и иногда программист. К сожалению, хороший дизайн не спасёт слабый текст.
Курс посвящён сильному тексту: лаконичному, информативному и ясному. Участники учатся отбирать информацию, структурировать предложения, выбрасывать ненужные слова и добиваться ясности; повышать доверие читателя и продавать товар.
На курсе демонстрируется техника редактирования в стиле кунфу. Она помогает превращать многословный канцелярский текст в интересное сообщение. В основе этой техники — приёмы«отжима» текста и поэтапного реструктурирования. Участники практикуются на текстеинтернет-магазинов, промостраниц и пользовательских интерфейсов.
Отдельные части курса посвящены принципам линейного и параллельного изложения, тексту в интерфейсе, структуре и устройству информационных продуктов на бумаге и экране.
Курс расширен до четырёх дней, чтобы уместить в себя ответы на все вопросы, которые возникали в первые два года проведения.
Каждый день состоит из лекции и практической части. Материал курса построен от малого к большому: от редактуры на уровне слов к предложениям, абзацам, тексту и информационному продукту. Отдельный день отведён рекламе.
Курс адресован всем, кто работает с текстом сайтов, буклетов, отчётов, коммерческих предложений и электронных писем.
3 дневный курс 2014 года
Облачко майл:
Облачко мега:
4-дневный курс от 7 фев 2015
Облачко майл:
Тыкаем в репку, качаем, воплощаем в жизнь полученные навыки!
#31009 Курс "Разработка интерфейсов" JavaScript или jQuery от Ильи Кантора
 Написано
на 05 Июль 2014 - 12:08
Написано
на 05 Июль 2014 - 12:08
Курс "Разработка интерфейсов" JavaScript или jQuery от Ильи Кантора
Курс "Разработка интерфейсов"
Курс включает в себя знания и навыки, необходимые для создания интерфейсов на JavaScript.
Мы изучаем вначале основы и важные тонкости работы с документом и событиями, затем, по мере курса, создание компонент, структурную организацию кода, а потом - архитектурные приёмы, используемые для разработки сложных интерфейсов.
Также курс включает в себя грамотное использование jQuery.
Так как это достаточно много всего, то часть материалов будет выделена в отдельный видеокурс, который вы получите для освоения перед началом занятий. Это позволит нам использовать месяц с большей пользой.
Этот курс желательно осваивать после "курса профессионального JavaScript". Одновременное освоение возможно, но только если вы раньше работали с JavaScript. Ввиду большой учебной нагрузки, которая при этом будет, сочетать такой "интенсив" с работой фулл-тайм не получится.
Цена продажника: 9500
Ссылка на продажник: http://javascript.ru/mk/12443
Программа курса:
- До курса: HTML/CSS, основы JS.
- Документ, генерация интерфейса.
Здесь мы учимся работать с документом, решать всевозможные задачи в браузере.- Внутреннее устройство браузера, работа со скриптами.
- Дерево DOM, особенности в современных браузерах и IE<9.
- Получение информации об элементах страницы.
- Модификация элементов и создание новых, с учетом производительности, чтобы интерфейсы работали быстро.
- Размеры и координаты элементов. Передвижение и прокрутка элементов.
- События, взаимодействие с посетителем.
Для 95% задач по взаимодействию с посетителем хватает примерно 15 событий. Мы изучим их, обращая внимание на важные тонкости, чтобы избежать типичных ошибок и глюков в коде.- Взаимодействие с посетителем при помощи мыши, клавиатуры, форм.
- События загрузки окна, документа, элементов.
- Делегирование как паттерн разработки.
- Drag'n'Drop.
- Разработка компонент, jQuery
Здесь мы собираем знания, которые приобрели до этого, чтобы строить компоненты, в том числе и довольно сложные. Когда мы умеем работать на уровне обычного JavaScript, то можем с пониманием применить этот фреймворк.- Структура компонента, организация кода.
- Грамотное применение jQuery.
- Практика и проверка правильности понимания, хорошего стиля работы с jQuery.
- Дополнительно
- Архитектура сложных интерфейсов, другие фреймворки, насколько хватит времени.
Все темы рассматриваются подробно, с упором на тонкости и практику.
Скачать:
#32463 Курс "Разработка интерфейсов" JavaScript или jQuery от Ильи Кантора
 Написано
на 10 Июль 2014 - 23:53
Написано
на 10 Июль 2014 - 23:53
#92060 Курс "Рисуем игровую графику"
 Написано
на 12 Январь 2015 - 16:56
Написано
на 12 Январь 2015 - 16:56
ДЛЯ КОГО ЭТОТ КУРС?
Для тех, кто рисует для себя, собирается рисовать на заказ, либо всегда мечтал работать в игровой индустрии.
Этот курс подойдет художникам, которые решили научиться рисовать на компьютере, а также начинающим.
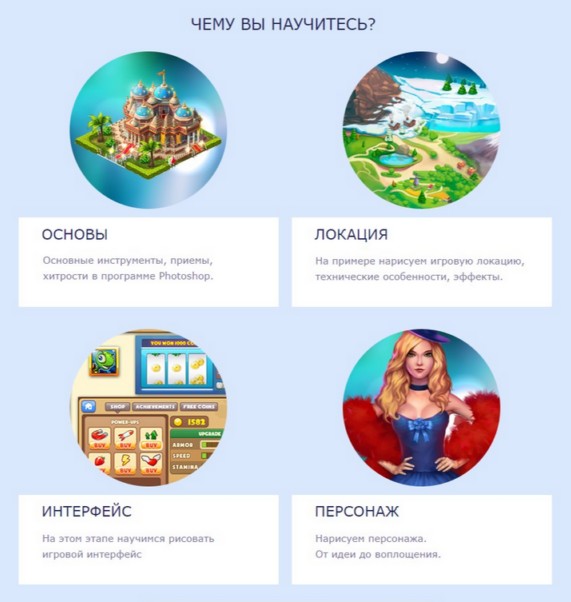
ПРОГРАММА КУРСА
1. Знакомство с программой.
Про интерфейс, удобство, горячие клавиши, оптимизация работы.
2. Слои, деформация объектов.
Работа со слоями, режимы наложения.
3. Принцип рисования по слоям.
Разберем поэтапно на примере.
4. Создание кисти.
Создадим свою кисть. Подробно про все параметры кисти.
5. Поиск референса, эскизы.
Советы по поиску качественных референсов.
6. Рисование через маски, smart объекты, Стили слоя.
Рисуем интерфейс, оптимизация работы со стилем слоя.
7. Создаем палитру.
Подбираем цвета, про сочетание цветов. Техники создания палитры.
8. Техники работы с объемом. Освещение.
9. Растровая графика + векторная.
Создание и редактирование векторных изображений, и совмещение с растровой графикой.
10. Работа со шрифтами.
#54226 Подскажите хорошие курсы для продвижения сайта в топ 10 и по оптимизации?
 Написано
на 24 Сентябрь 2014 - 12:47
Написано
на 24 Сентябрь 2014 - 12:47
Самый лучший курс по SEO от EMPO.
Курсы SEO с гарантией результата [PLATINUM (VIP)]
Скачать:
Обязательное руководство (мануал, книга) для всех SEO оптимизаторов от EMPO.
SEO-оптимизация целевых страниц - Настольное руководство!
Скачать:
Если был Вам полезен - жмите ⇑.
#64805 Нетология Основы веб-технологий сайты и приложения
 Написано
на 26 Октябрь 2014 - 08:50
Написано
на 26 Октябрь 2014 - 08:50
Начните разбираться в технологиях веб-разработки: узнайте, как работают сайты, какие используются языки программирования и системы управления, как определиться с хостингом и серверным оборудованием.
Все это поможет вам говорить на одном языке с разработчиками, правильно рассчитать бюджет на создание сайта и выбрать наиболее подходящие вам решения.
продажник
http://netology.ru/kursy/osnovy-web-tekhnologiy
СКАЧАТЬ
ОТ + В РЕПУТАЦИЮ НЕ ОТКАЖУСЬ ВСЕМ УДАЧИ !!!
#65506 "Каллиграфия и леттеринг 21 века" - Покрас Лампас
 Написано
на 27 Октябрь 2014 - 23:21
Написано
на 27 Октябрь 2014 - 23:21
Продажник https://granimedia.t...u/event/107742/

На мастер-классе: культура стрит-арта и каллиграфии, десятки профессиональных навыков, принципов, инструментов, идей и всё остальное, что только можно хотеть узнать о каллиграфии и леттеринге.
Будет полезно всем, кто работает или хочет работать со шрифтами,
дизайнерам, арт-директорам, иллюстраторам, а также тем, кто увлекается стрит-артом.
